I am posting this thread about the walk-in cooler my Dad and I built for anyone who may have been thinking of doing the same thing.
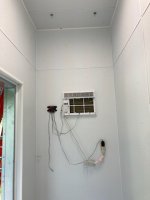
The first thing I would do if I were interested in building this is to look at the website www.storeitcold.com. That is the website of the manufacturer that makes the "coolbot". It's an aftermarket controller that hooks to a conventional window mounted A/C unit which is the method we use to keep our cooler cold. There is more info on there website than I would ever want to type.
The next thing I will say is this cost us around $1100. We didn't have access to a reliable place to hang game and we wanted a cooler we could use whenever and wherever we wanted as we butcher all our own meat. We also wanted the ability to hang game and not have to butcher it immediately if the weather wasn't cooperating.
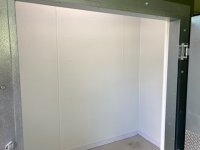
The inside dimensions of our cooler are 48"x87" and 89" tall. I made all the wall and floor and roof panels independent of each other with the idea that this could be disassembled when not in use. It sits on a concrete pad that my parents used to have a hot tub on. If yours doesn't sit on a concrete pad you would have to build the floor different from ours to support the weight of people hanging meat.
All of our framing material was cedar from a deck my parents took down. They were 2x6's that we ripped down to 4" to fit the 4" of Styrofoam we used to insulate the walls. We used 4x8 panels of 2" insulation that had an R-value of 13.6 per panel. We doubled them up so our walls have an R-Value of over 27 as well as the roof. The manufacturer of the cool bot said that if the floor was on concrete that one panel of insulation on the ground with a sheet of plywood on it is all you need. We encased our panel for the floor in 2" framing material with a 1/2 OSB panel on the bottom and a 3/4 OSB panel on top. If your floor isn't on concrete you would probably want to put 2 sheets of insulation in the floor as cold sinks.
We put the 48x87 floor down then wrapped the walls around it and secured the walls to the floor with 8" timber tech lag screws. The end walls are 48" wide and the front one has a 36" door and the back one has the air conditioner hole in it. The side walls are 96" long and when the front walls sit tight to the floor, the side walls sit tight to the floor and are the same length as the floor and end walls. The two end walls have 1x6 boards that overhang the edges so when all the walls are together we screwed through the 1x6 to attach the walls to each other. We stapled a layer of Styrofoam sill seal in between every joint to make things air tight.
If you are making one that is permanent you could probably skip some of these steps and build it with more traditional framing methods.
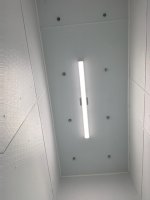
The roof for ours is also 48x87 and 4" deep. The plywood overhangs the ends by 4 1/2" each way to sit on the end walls and there are more 1x6 boards on the sides to overlap the sidewalls. We had to add a strip of 1/2" OSB to the top of the side walls for the 1x6's to sit flush with the rest of the framing. The roof slips into the the walls like the lid of a cooler and again has sill seal at all the joints.
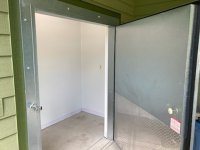
My Dad had access to some heavy mill plastic that has string woven through it in sort of a chain link fence pattern. We wrapped the inside of each wall and the roof with this before assembly which made the roof slide into place easier. We put this on thinking it would make the insides easy to clean. We are intending to put a tarp or more heavy plastic down on the floor that can be removed and either cleaned or replaced between hanging animals.
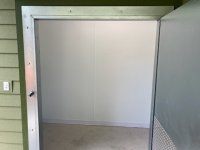
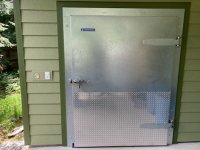
We used a 36" solid core interior door for ours because there was a new one for sale at the Habitat for Humanity restore for $50. It only has an R-Value of roughly 3 so we glued the scrap insulation to the back of the door and then screwed plywood to the back to hold the insulation in place. Our door now has an R-Value of about 20. We installed the door backwards so it opens outside and doesn't need to swing in and take up cooler space. Our floor sits 2" higher than the door opening. I put 1" material around the threshold and jamb of the door with weather stripping on it that the door closes into to make it air tight. If you are making one permanent you could use an insulated exterior door and not bother with any of that but I didn't want to pay the money for one and with our floor sitting higher than the door opening I would have had to remove the threshold anyway to get the door to swing out.
I then shot expanding spray foam around the door case. The manufacturer says not to use fiberglass insulation as the cold environment in the cooler will pull moisture through the walls and cause mold issues. We stuffed fiberglass around the air conditioner anyway because I didn't want to use spray foam as that would make it difficult to remove the air conditioner later and I figured that when the fiberglass around the air conditioner molds it will be easy to take it out and replace it.
There are detailed plans on the coolbot website showing how to make an airtight wall system that would allow you to use fiberglass batts in the walls which would be cheaper than the Styrofoam but wouldn't get the same R-Value and I didn't want to worry about potential mold issues.
There is channel metal that sits on top of the walls that have 8 eye bolts run through them to hang game on. We are looking for some sort of metal cart or maybe a wall mounted shelf like a closet organizer that can be easily removed when not needed for hanging setting loose meat like backstraps or tenderloins on. It looks like we can easily hang 2 elk at a time in here but we haven't hung any meat in it yet to see how much room they actually take up. We did turn it on and it got down to 35 degrees in about 20 minutes. I don't think it's supposed to get cold enough to freeze but both the coolbot's thermometer and two separate thermometers that we set in there to check temperature have all been as low as 32.
The only other specs I can think of is that we used a 8000BTU air conditioner. That is within the specs of what the manufacturer requires. My cousin's husband and his dad built a permanent one of these about the same size and they used a 6000BTU air conditioner and they said that if they did it again they would go with a bigger unit.
Cost of this broke down roughly as
460 for insulation
315 for the coolbot
125 for the A/C unit new on Craigslist
80 for the OSB
50 for the door
70 for extras like spray foam, screws, sill seal, eye bolts, and whatever else we needed.
I have been in construction for 11 years so we had all the tools and experience to build this we needed but I think as long as you are reasonably handy this wouldn't be that hard to build. It took us about 24 hours total.
Also I guess a word of warning about ripping the Styrofoam panels on a table saw is that everything I read says they will kick back on on you often but if you are experienced with a table saw you shouldn't have any problems. I didn't have any kick on me but I see how you could bind the blade easy as they are so light but I imagine that even if you did kick one back it probably wouldn't hurt all that much being Styrofoam.
If anyone plans to build one of these and has questions feel free to ask and I will try to answer them. Also I have read from a few other people on here that they have built the same thing so if anyone wants to post pics of there's or has more to offer feel free. I will post the pics I have of ours now and hopefully will update this soon with meat in ours.
The first thing I would do if I were interested in building this is to look at the website www.storeitcold.com. That is the website of the manufacturer that makes the "coolbot". It's an aftermarket controller that hooks to a conventional window mounted A/C unit which is the method we use to keep our cooler cold. There is more info on there website than I would ever want to type.
The next thing I will say is this cost us around $1100. We didn't have access to a reliable place to hang game and we wanted a cooler we could use whenever and wherever we wanted as we butcher all our own meat. We also wanted the ability to hang game and not have to butcher it immediately if the weather wasn't cooperating.
The inside dimensions of our cooler are 48"x87" and 89" tall. I made all the wall and floor and roof panels independent of each other with the idea that this could be disassembled when not in use. It sits on a concrete pad that my parents used to have a hot tub on. If yours doesn't sit on a concrete pad you would have to build the floor different from ours to support the weight of people hanging meat.
All of our framing material was cedar from a deck my parents took down. They were 2x6's that we ripped down to 4" to fit the 4" of Styrofoam we used to insulate the walls. We used 4x8 panels of 2" insulation that had an R-value of 13.6 per panel. We doubled them up so our walls have an R-Value of over 27 as well as the roof. The manufacturer of the cool bot said that if the floor was on concrete that one panel of insulation on the ground with a sheet of plywood on it is all you need. We encased our panel for the floor in 2" framing material with a 1/2 OSB panel on the bottom and a 3/4 OSB panel on top. If your floor isn't on concrete you would probably want to put 2 sheets of insulation in the floor as cold sinks.
We put the 48x87 floor down then wrapped the walls around it and secured the walls to the floor with 8" timber tech lag screws. The end walls are 48" wide and the front one has a 36" door and the back one has the air conditioner hole in it. The side walls are 96" long and when the front walls sit tight to the floor, the side walls sit tight to the floor and are the same length as the floor and end walls. The two end walls have 1x6 boards that overhang the edges so when all the walls are together we screwed through the 1x6 to attach the walls to each other. We stapled a layer of Styrofoam sill seal in between every joint to make things air tight.
If you are making one that is permanent you could probably skip some of these steps and build it with more traditional framing methods.
The roof for ours is also 48x87 and 4" deep. The plywood overhangs the ends by 4 1/2" each way to sit on the end walls and there are more 1x6 boards on the sides to overlap the sidewalls. We had to add a strip of 1/2" OSB to the top of the side walls for the 1x6's to sit flush with the rest of the framing. The roof slips into the the walls like the lid of a cooler and again has sill seal at all the joints.
My Dad had access to some heavy mill plastic that has string woven through it in sort of a chain link fence pattern. We wrapped the inside of each wall and the roof with this before assembly which made the roof slide into place easier. We put this on thinking it would make the insides easy to clean. We are intending to put a tarp or more heavy plastic down on the floor that can be removed and either cleaned or replaced between hanging animals.
We used a 36" solid core interior door for ours because there was a new one for sale at the Habitat for Humanity restore for $50. It only has an R-Value of roughly 3 so we glued the scrap insulation to the back of the door and then screwed plywood to the back to hold the insulation in place. Our door now has an R-Value of about 20. We installed the door backwards so it opens outside and doesn't need to swing in and take up cooler space. Our floor sits 2" higher than the door opening. I put 1" material around the threshold and jamb of the door with weather stripping on it that the door closes into to make it air tight. If you are making one permanent you could use an insulated exterior door and not bother with any of that but I didn't want to pay the money for one and with our floor sitting higher than the door opening I would have had to remove the threshold anyway to get the door to swing out.
I then shot expanding spray foam around the door case. The manufacturer says not to use fiberglass insulation as the cold environment in the cooler will pull moisture through the walls and cause mold issues. We stuffed fiberglass around the air conditioner anyway because I didn't want to use spray foam as that would make it difficult to remove the air conditioner later and I figured that when the fiberglass around the air conditioner molds it will be easy to take it out and replace it.
There are detailed plans on the coolbot website showing how to make an airtight wall system that would allow you to use fiberglass batts in the walls which would be cheaper than the Styrofoam but wouldn't get the same R-Value and I didn't want to worry about potential mold issues.
There is channel metal that sits on top of the walls that have 8 eye bolts run through them to hang game on. We are looking for some sort of metal cart or maybe a wall mounted shelf like a closet organizer that can be easily removed when not needed for hanging setting loose meat like backstraps or tenderloins on. It looks like we can easily hang 2 elk at a time in here but we haven't hung any meat in it yet to see how much room they actually take up. We did turn it on and it got down to 35 degrees in about 20 minutes. I don't think it's supposed to get cold enough to freeze but both the coolbot's thermometer and two separate thermometers that we set in there to check temperature have all been as low as 32.
The only other specs I can think of is that we used a 8000BTU air conditioner. That is within the specs of what the manufacturer requires. My cousin's husband and his dad built a permanent one of these about the same size and they used a 6000BTU air conditioner and they said that if they did it again they would go with a bigger unit.
Cost of this broke down roughly as
460 for insulation
315 for the coolbot
125 for the A/C unit new on Craigslist
80 for the OSB
50 for the door
70 for extras like spray foam, screws, sill seal, eye bolts, and whatever else we needed.
I have been in construction for 11 years so we had all the tools and experience to build this we needed but I think as long as you are reasonably handy this wouldn't be that hard to build. It took us about 24 hours total.
Also I guess a word of warning about ripping the Styrofoam panels on a table saw is that everything I read says they will kick back on on you often but if you are experienced with a table saw you shouldn't have any problems. I didn't have any kick on me but I see how you could bind the blade easy as they are so light but I imagine that even if you did kick one back it probably wouldn't hurt all that much being Styrofoam.
If anyone plans to build one of these and has questions feel free to ask and I will try to answer them. Also I have read from a few other people on here that they have built the same thing so if anyone wants to post pics of there's or has more to offer feel free. I will post the pics I have of ours now and hopefully will update this soon with meat in ours.


")